Prepare raspberry boot media
Download and run rpi-imager
example for Arch Linux:
sudo pacman -Syu rpi-imager
sudo rpi-imager
Operating System
From the operating system list select ‘Raspbery Pi OS (other)’ and then ‘Raspberry Pi OS Lite (32-bit)’
Configuration
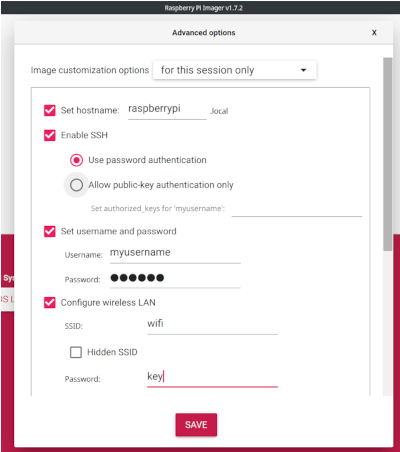
Click the setup icon and and set hostname, username/password, enable ssh and configure wireless lan.

Configure Raspberry Pi
Connect to Raspberry pi
Connect to Raspberry Pi using the username/password you set earlier using SSH. You need the IP assigned to Raspberry Pi. eg:
ssh -l username rpi
Gain elevated privileges and install necessary libraries
sudo -Es
apt install -y dnsmasq hostapd
Configure hostapd for the Access Point
touch /etc/hostapd/hostapd.conf
chmod 600 /etc/hostapd/hostapd.conf
cat > /etc/hostapd/hostapd.conf <<EOF
country_code=GR
ctrl_interface=/var/run/hostapd
driver=nl80211
ssid=MY_WLAN_NAME
hw_mode=g
channel=7
auth_algs=1
wpa=2
wpa_passphrase=MY_PASSPHRASE
wpa_key_mgmt=WPA-PSK
wpa_pairwise=TKIP
rsn_pairwise=CCMP
EOF
Note: make sure to have the same coutry code in both /etc/hostapd/hostapd.conf and /etc/wpa_supplicant/wpa_supplicant.conf
Test creation and deletion of uap0 virtual device on wlan0:
/sbin/iw dev wlan0 interface add uap0 type __ap
/sbin/iw dev uap0 del
If the previous tests to create and delete the uap0 virtual device succeeds, enable starting uap0 AP virtual interface on wlan0:
SYSTEMD_EDITOR=tee systemctl edit --force --full uap@.service <<\EOF
[Unit]
Description=IEEE 802.11 %p%i AP on wlan%i with hostapd
After=network.target

[Service]
Type=forking
PIDFile=/run/hostapd.pid
Restart=on-failure
RestartSec=2
Environment=DAEMON_CONF=/etc/hostapd/hostapd.conf
EnvironmentFile=-/etc/default/hostapd
ExecStartPre=/sbin/iw dev wlan%i interface add %p%i type __ap
ExecStart=/usr/sbin/hostapd -i %p%i -P /run/hostapd.pid -B $DAEMON_OPTS ${DAEMON_CONF}
ExecStopPost=-/sbin/iw dev %p0 del

[Install]
WantedBy=multi-user.target
EOF

systemctl stop hostapd # if the default hostapd service was active before
systemctl disable hostapd # if the default hostapd service was enabled before
systemctl enable uap@0.service
rfkill unblock wlan
Define the wireless interface IP configuration
cat >> /etc/dhcpcd.conf <<EOF

interface wlan0 # these two lines are not strictly needed, as wlan0 uses the default configuration
    dhcp

interface uap0 # this defines static addressing to uap0 and disables wpa_supplicant for this interface
    static ip_address=192.168.50.1/24
    ipv4only
    nohook wpa_supplicant
EOF


systemctl disable wpa_supplicant.service
Enable routing and IP masquerading
DEBIAN_FRONTEND=noninteractive apt install -y netfilter-persistent iptables-persistent
cat >/etc/sysctl.d/routed-ap.conf <<\EOF
# https://www.raspberrypi.org/documentation/configuration/wireless/access-point-routed.md
# Enable IPv4 routing
net.ipv4.ip_forward=1
EOF
Update firewall rules
iptables -t nat -A POSTROUTING -o eth0 -j MASQUERADE; iptables -t nat -A POSTROUTING -o wlan0 -j MASQUERADE; iptables -A FORWARD -i wlan0 -o uap0 -m state --state RELATED,ESTABLISHED -j ACCEPT; iptables -A FORWARD -i uap0 -o wlan0 -j ACCEPT; netfilter-persistent save
dnsmasq configuration
cat >> /etc/dnsmasq.conf <<EOF
# disables dnsmasq reading any other files like /etc/resolv.conf for nameservers
no-resolv

interface=uap0
no-dhcp-interface=lo,wlan0
domain-needed
bogus-priv
server=1.1.1.1
dhcp-range=192.168.50.50,192.168.50.199,12h
dhcp-option=3,192.168.50.1
EOF
Configuration is finished, reboot to apply all changes
reboot
Downgrade WiFi driver and pin old version
With the current WiFi driver only a couple of clients can connect to Raspberry Pi AP. Downgrading to previous version will solve this issue.
curl -O http://archive.raspberrypi.org/debian/pool/main/f/firmware-nonfree/firmware-brcm80211_20190114-1+rpt4_all.deb
sudo dpkg -i firmware-brcm80211_20190114-1+rpt4_all.deb
sudo apt-mark hold firmware-brcm80211
Schedule daile restarts of Raspberry Pi [optional]
I prefer to schedule a daily reboot for the AP
sudo -Es
cat >> /etc/crontab <<EOF
0  2    * * *   root    reboot
EOF
Add VPN functionality
When I setup an Access Point, I prefer to add VPN capabilities to it